Edit an item's details
You can edit the details of an individual item in any collection you create.
|
Note: To edit items from a public collection, you must copy and save the collection first. Then, you can modify the items in the copied collection on the PRIVATE tab. |
- Find and open the collection containing the item you want to edit.
- On the item, select
 > Edit. A pop-up appears.
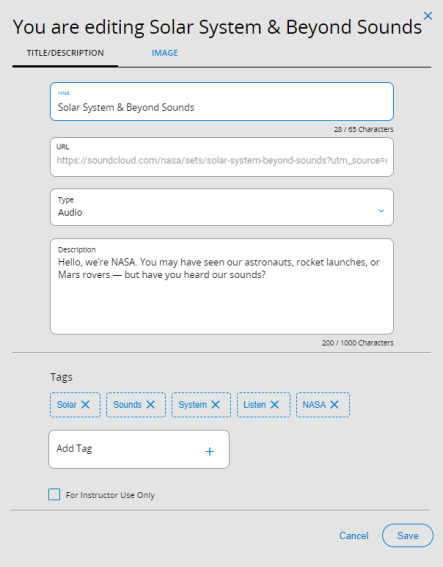
- For Title/Description, do any of the following:
- To change its Title, Type, or Description, click in the appropriate field.
Note: An item's description is automatically pulled from its source, and therefore might include inaccurate characters. Edit it as needed.
- To delete one or more Tags, click the desired tag to remove it.
- To add one or more Tags, click in the new tag field to type your text, and then click
 .
.Notes:
- When you type in the new tag field, tag suggestions appear. Only tags that have been used by Administrator, Instructor, Faculty, and Staff roles at your school appear as suggestions.
- Once you add an item to your collection, click a tag to automatically search Destiny Discover for other resources based on that topic.
- You can perform a keyword search in Destiny Discover for any auto-populated tags or new tags you add to an item.
- Tags are only clickable for authenticated users. If you share a link with a non-Destinyuser, they will not be able to click on the tags.
To mark an item "For Instructor Use Only", select the checkbox.
Notes:
- Only users with Administrator, Instructor, Faculty, and Staff roles can see the checkbox.
- When an item is marked "For Instructor Use Only", users with student roles cannot see this item in the collection.
- You can move an item in and out of instructor use at any time.
- To change its Title, Type, or Description, click in the appropriate field.
- Click Save. Or, click Image to change an item's image.
- For Image, click REMOVE IMAGE. Then, do one of the following:
- Click UPLOAD IMAGE. Select the desired image from your computer.
- Drag and drop an image from your computer into the box.
Notes:
- Only users with Administrator, Instructor, Faculty, and Staff roles can upload a custom resource image.
- You can only upload a custom resource image for items in your own collection.
- To resize your image, use the scroll bar to make it smaller or larger.
- To change which part of the image appears, click and drag it to the desired position.
- If you copy the item to another collection, you have to upload the custom resource image again. It will not automatically copy over with the item.
- Only users with Administrator, Instructor, Faculty, and Staff roles can upload a custom resource image.
- After you make your changes, click Save.